For many years I've been running a domotica platform which, like with everybody, keeps extending.
As a software engineer, the reasons for this "hobby" are obvious.
Now I want to share my latest project here, so that hopefully it will contribute to the community knowledge and hopefully will be used as a reference once. Otherwise it's no problem to Ignore

Project Outline
Power consumption is always a hot issue with domotica. That's why this project came into existence.
Targets
Serve as a NAS
X10 control
This controller is configured based on a Raspberry PI(Model B) single boarded computer. This tiny (85mm x 54mm) board performs surprisingly well.
Basically it suits all needs, and even more. The hardware specifications:
CPU: 700 MHz ARM11
GPU: BroadCom core 4(supports 1080p)
RAM: 512MB
Built-in 10/100 LAN (RJ45)
Built-in Audio
2x USB (2.0)
VGA Output
HDMI Output
SD-card reader
GPIO Port
Power: 5v via Micro-USB
Shopping List:
Raspberry PI Type B
Transparent Case
Micro-USB PSU (1A)
SD-Card (4 GB) class 10
For less that 65 euro's, I was supplied with all needed components.
Set-up
After "clicking" the Raspberry into the case, it was time to set it up and make it work.
First I started with the OS.
The Linux distribution "tailored" for the raspberry is called Rasbian which is based on Debian. I have used the Raspbian "Wheezy" image, which can be downloaded from here
This image is flashed onto the SD card with the help of a small tool called "HDD Raw copy tool".
After 2 minutes this was done, so I hooked up the raspberry to a monitor, hooked-up a keyboard, inserted the SD-card and powered it up.
Rabian-conf
After the boot, you are requested to log in. The default username and password are:
U: pi
P: Raspberry
After log in, a build-in configuration tool for the rasbian comes up. This tool starts automatically after the first boot. To run it manually the command is: sudo raspi-conf
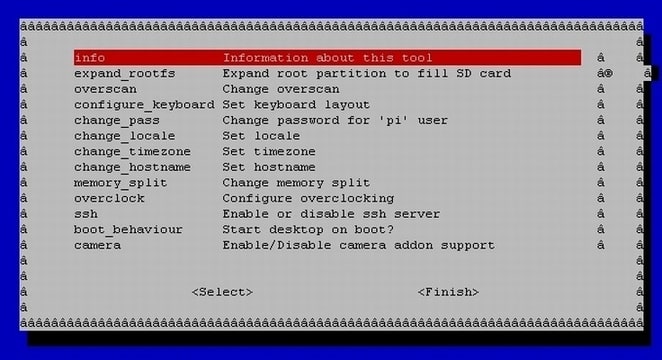
This is very handy tool for doing all the basic set-up tasks needed. I will not go through it step by step, since this tool is self explaining.
The tasks completed with this tool:
Expand_rootfs - expand root partition to fill SD card
change_timezone -Set timezone
ssh - enable ssh server
==This part is basic Linux, but for completeness added==
Set-up the network
For the controller a static IP address is preferable. The network configuration is, as many things within Linux, stored in a file. I use pico for text editing.
first edit the network configuration file with pico:
sudo pico /etc/network/interfaces
comment out the dhcp setting line by adding a #
#iface eth0 inet dhcp
Add the following lines to your network settings:
iface eth0 inet static
address 192.168.1.100
netmask 255.255.255.0
network 192.168.1.0
broadcast 192.168.1.255
gateway 192.168.1.1
Save the file (ctrl+x)
check if changes are saved correctly with: sudo cat /etc/network/interfaces
Next step is to set the DNS servers. Since we use static IP we need to supply the DNS server addresses.
The addresses are stored in a file located /etc/resolv.conf
edit this file with a text editor (sudo pico /etc/resolv.conf)
Add the IP addresses of your DNS server. Also those of google can be added:
nameserver 8.8.8.8
nameserver 8.8.4.4
Save the file (ctrl+x)
Apply all network changes by restarting the network:
sudo service networking restart
This completes the basic network set-up, at this point I moved the Raspberry to it's final location. There I hooked it up to the network, connected the power and started the system.
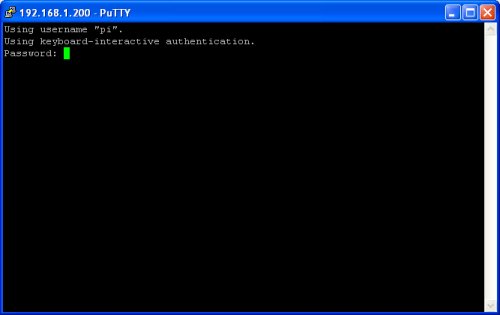
Log-in via SSH
If you are a windows user, connect to the Raspberry via SSH using PUTTY.
Connecting is very easy, just type in your statically chosen IP address in the Host name input box, Port 22. Select SSH as the protocol and click "open".
You are requested to log in.
Use the default username/password or what ever you changed it to, and you are connected.
Security
This will help you set-up the default security so it's safe to connect too the internet without having to worry too much about hackers and script kiddies.
First, make sure you have changed the default password for the pi user.
If not already done, this can be done with raspi-conf or via chpasswd.
Now we need to update the linux kernell so it will support firewall iptables.
So get the latest CA(Certificate Authority) certificates:
sudo apt-get install ca-certificates
this will download and install the needed packages automatically
Additionally we need a tool to keep the firmware up to date which is called Hexxeh.
This package can be downloaded and installed with the command:
sudo wget http://goo.gl/1BOfJ -O /usr/bin/rpi-update && sudo chmod +x /usr/bin/rpi-update
We now need to install the git(Kernel directory content management system) core , this is the main software to access the latest Unix build.
sudo apt-get install git-core
This gives us the possibility to update the kernell, so let's see what happens:
sudo rpi-update
This can take a couple of minutes, but be patient..
We have updated the kernel, but this wont take effect until a reboot:
sudo reboot
Now I will be setting up the iptables rules so that external visitors cant login to the Raspberry from the Internet.
To do so, I make a file first:
sudo bash -c 'iptables-save > /etc/network/iptables'
which is the file used to initiate iptables from on a system boot.
Now let us setup the file so a reboot keeps the iptables configuration. To do this we need to edit the /etc/network/interfaces file.
sudo pico /etc/network/interfaces
add the following line at the end on the file:
pre-up iptables-restore < /etc/network/iptables
This means that before the network starts setup the iptables from our config file.
Finally now edit the iptables file to set the firewall rules.
sudo pico /etc/network/iptables
==EXAMPLE CONFIG file - PLEASE USE DECENT INFO TO CUSTOMIZE==
*filter
:INPUT DROP [23:2584]
:FORWARD ACCEPT [0:0]
:OUTPUT ACCEPT [1161:105847]
-A INPUT -i lo -j ACCEPT
-A INPUT -i eth0 -p tcp -m tcp --dport 80 -j ACCEPT
-A INPUT -i eth0 -p tcp -m tcp --dport 443 -j ACCEPT
-A INPUT -s 192.168.1.0/24 -j ACCEPT
-A INPUT -s 192.168.1.1/32 -i tcp -p tcp -m tcp --dport 22 -j DROP
-A INPUT -p icmp -m icmp --icmp-type 8 -j ACCEPT
-A INPUT -i eth0 -m state --state RELATED,ESTABLISHED -j ACCEPT
COMMIT
====
And finally these settings should be loaded into the firewall:
sudo iptables-restore /etc/network/iptables
To confirm the iptables:
sudo iptables-save
This should list the just created rules.
This concludes the basic configuration of your raspberry. Now I will continue full-filling the project tasks:
Serve as a NAS
The first actual task the controller is going too full-fill, is to serve as a NAS. For storage I use an 1 TB external USB WD my book HDD.
This drive will be mounted to the Raspberry, and with the help of samba made available as a network share.
So after connecting the HDD to the USB port from the Raspberry, I started setting up samba.
This I will just list, because it's not any different from other Linux machines:
1: Check if HDD is working: sudo fdisk -l
2: Make a mounting directory : sudo mkdir /mnt/disk1
3: By default ntfs is not installed, if you are using a NTFS formatted disk, install the ntfs-3g package: sudo apt-get install ntfs-3g
4: Attach the disk to the folder in the fstab configuration: sudo pico /etc/fstab
5: add the line(s) for each disk:
/dev/sda1 /mnt/disk1 ntfs-3g defaults 0 0
and save the file
6: make the files visible to the filesystem : sudo mount -a
7: install samba: sudo apt-get install samba
8: install common libraries: sudo apt-get install samba-common-bin
9: Configure samba: sudo pico /etc/samba/smb.conf
10: Restart the samba service: sudo service samba restart
Now you should be able to access the share from any computer in your network. You can find it via: \\raspberrypi\{share_name}
To make sure everything stays alive after a reboot, we need to do two more steps:
install autofs to automatically mount the USB drive: sudo apt-get install autofs
Edit the configuration file from autofs: sudo pico /etc/auto.master
add:
{+auto.master}
/media/ /etc/auto.ext-usb --timeout=10,defaults,user,exec,uid=1000
Now you can reboot and the server will keep on working and sharing your windows files on boot..
X10 Control
The main target from this project was to be able to control X10 devices via the raspberry.
For the interfacing with the X10 network, I use a CM15PRO.
But to get this too work, let me start explaining the needs:
Interface:
Currently there is no "driver" for the CM15PRO interface. To overcome this there is a TCP/IP gateway deamon called mochad.
This tool exposes a TCP/IP socket where controlling software "bridges" in.
Of course this brings limitations, but all the basic X10 tasks, this works like a charm.
Instructions:
install the libusb files: sudo apt-get install libusb-1.0-0-dev
get mochad and unpack:
sudo wget http://sourceforge.net/projects/mochad/ ... .15.tar.gz
sudo tar xf mochad-0.1.15.tar.gz
Build it:
cd mochad-0.1.15
./configure
make
sudo make install
Test it:
type the command: echo "pl a1 on" | nc localhost 1099
This should activate device A1. If so, you can continue.
Controller software:
To control and send the commands to the CM15PRO is use OpenRemote. This a very neat program with support for tablets, smrtphones,.. They supply an online UI editor where you can create your own GUI. To use this in combination with mochad, there are some things to be aware of.
To get OpenRemote going on a Raspberry, a complete howto is available: http://www.openremote.org/display/docs/ ... aspberryPi
When all the above steps are taken, the raspberry should work as described. But to get OpenRemote to work properly within this setup, I will explain howto make a very basic UI and set the devices so that they work.
First thing to test is if the controller software is actually working.
I have used an iPhone and an iPad to test.
First install the (free) App from the app store and open it and guide your way through the initiation.
When everything is OK, the app recognizes the controller software automatically.
So now we can start creating the Interface and binding the functions.
Browse to the editor: https://composer.openremote.org/demo/
After registering and logging in, you will see the editor.
Basically there are 2 editors available:
1: Devices
2: UI Designer
For this project, the devices are most important. Because the X10 commands are broadcasted via a TCP/IP Socket, the regular /direct X10 interfacing is not supported.
But to get things working, create a new device
-Add a name: Lamp A1
-Add a vendor: X10
-Add a model: LM12
Now we need to tell what this device is capable of. This we do by binding commands to it.
Select the just created device
Select: New > New command
Give the command a name:
On
From the Protocol drop down, select: TCP/IP
Fill in the 3 fields:
IP Address: <IPofYourRaspberry>
Port: 1099
Command: PL A1 ON
<Submit>
Add a command to go off:
Select the device
Select: New > New command
Give the command a name:
Off
From the Protocol drop down, select: TCP/IP
Fill in the 3 fields:
IP Address: <IPofYourRaspberry>
Port: 1099
Command: PL A1 OFF
<Submit>
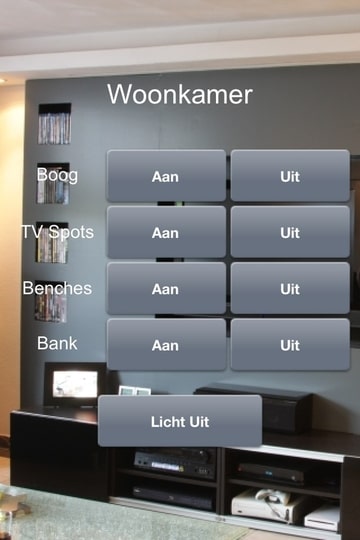
You can now go on and design a UI and bind the commands to buttons.
This will let you be able to control your X10 devices with any smartphone.
This is my first trail: